- Прокси серверы
- Страны
- Соцсети
- Онлайн игры
- Софт
- Другие цели
- Браузер Каталог всех прокси
- ipv4
- ipv6
- Цены
- Партнерская программа
- Прокси оптом
- Контакты

04.01.2019

Купить индивидуальные высокоскоростные прокси для Android
Если вы задаетесь вопросом о том, как настроить прокси в операционной системе Android, то вероятно вы уже знаете, для чего. Кратко напомним, в чем суть прокси-сервера.
Это программа для обхода ограничений, например:
Прокси-сервер перенаправляет трафик пользователя, присваивая ему новый IP адрес и скрывая реальный.
Еще одно полезное свойство прокси – дает возможность посещать сайты анонимно. Это можно использовать для накрутки лайков в соцсетях.
Принцип настройки не отличается от таковой на ноутбуке или компьютере. Необходимо указать системе адрес прокси-сервера, который состоит из IP адреса формата ХХХ.ХХХ.ХХХ.ХХХ, и номера порта формата ХХХХ.
Особенности настройки зависят от наличия root-прав на телефоне. Наличие этих прав позволяет сделать настройку более гибкой и удобной, установив специальные приложения. Взлом телефона осуществляется на страх и риск владельца.
Если права получены, для настройки проще всего установить программу ProxyDroid. Принцип работы – при подключении интернет телефон связывается с прокси-сервером и работает через него.
Принцип:
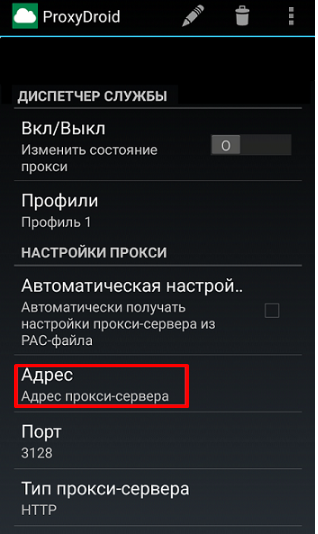
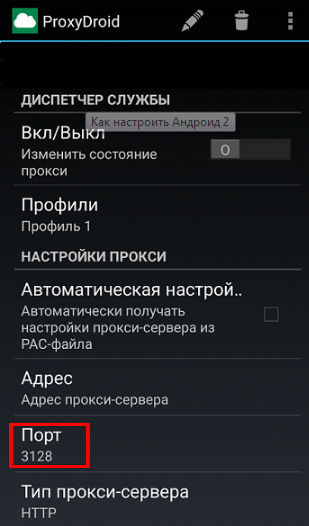
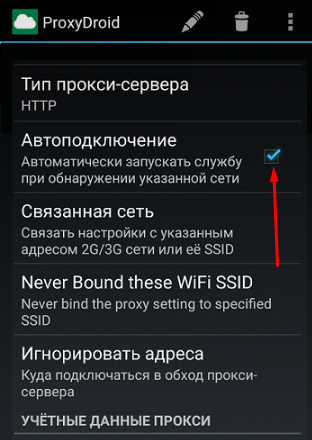
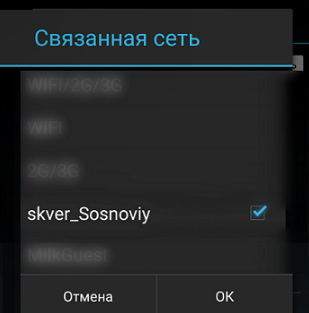
Программа позволяет создавать профили, что удобно, если есть несколько IP адресов прокси.
Минус – работа через прокси будет строиться через стандартный браузер.
Для глубокой настройки установите на телефон программу Terminal Emulator. Это имитация командной строки. Меняет настройки на уровне ядра.
Принцип:
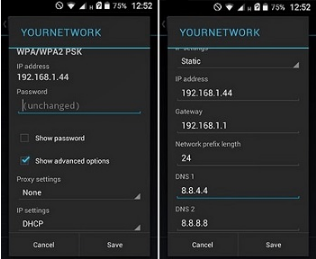
Через стандартный пункт в настройках сети.
Wi-Fi:
Теперь при подключении к этой сети будет происходить переадресация на прокси.
Мобильная сеть. Для работы нужно скачать одну из программ: Opera Mobile, Mozilla или Habit Browser.
Причин может быть несколько:
Часто общественные бесплатные прокси-серверы перестают работать. Предсказать время их «жизни» невозможно. Выходом является покупка индивидуального адреса прокси. Плата будет компенсирована стабильной работой и гарантированной анонимностью и безопасностью.
Попробуйте настроить прокси для андроид на своем телефоне – теперь вы знаете, как это сделать.
Также, вы можете воспользоваться нашей видео инструкцией по настройке прокси серверов для Android:


Партнерская программа позволяет вам зарабатывать 10% от всех платежей клиентов пожизненно, приведенных по вашей партнерской ссылке.
Для участия в программе вам необходимо
привлекать к нам новых клиентов по реферальной ссылке — зарегистрировавшийся по вашей ссылке пользователь закрепляется за вами пожизненно, и со всех его выплат вы будете получать 10%.
Партнерское вознаграждение может выводиться на  Tether USDT (TRC20),
  Банковскую карту, или используйте ее для оплаты любых услуг нашего сервиса.

 Россия
 Украина
 Беларусь
 Казахстан
 США
США Канада
 Германия
 Вконтакте
 Одноклассники
 Facebook
 Instagram
 Pinterest
 Telegram
 Youtube
 Lineage 2
 ArcheAge
 Pokemon Go
 World of Warcraft
 Perfect World
 World of Tanks
 Steam
Steam VkJust
 SocialKit
 Tooligram
 Keycollector
 Sobot
Sobot Spotify
 Docker
 Ebay
Ebay Amazon
 Teamviewer
 iPhone
 Samsung
 Play Station 4
 Xbox One
 Opera
Opera Firefox
 Safari
 Dolphin






















 Прокси чекер
 Скорость
 Порты
Порты Мой IP
 черный список
 IPV6
IPV6 API
API Бесплатные прокси