Blog
TUTORIAL: EASY SETTING UP IPV4 AND IPV6 PROXIES IN PROXIFIER SOFTWARE IN 30 SECONDS
04.01.2019

Proxifier Features
The program is available for the government website http://proxifier.com for an unselfish download. It is for PCs before Windows and macOS. The utility is paid, with a free period of 31 days. Useful piss programs:- Direct traffic from specific applications or all at once to a proxy.
- Bypass network restrictions, firewall.
- Support IPv4 and IPv6.
- Create profiles and rules for specific applications and hosts.
- Create a chain of proxy servers to increase anonymity.
- See current traffic in real time.
- HTTP protocols, SOCKS 4/5;
- Windows versions – XP, 7, 8, 10;
- 64-bit encryption.
Setting up Proxifier
Most of the necessary settings are made through the Profile list part, subitem “Proxy Servers”.
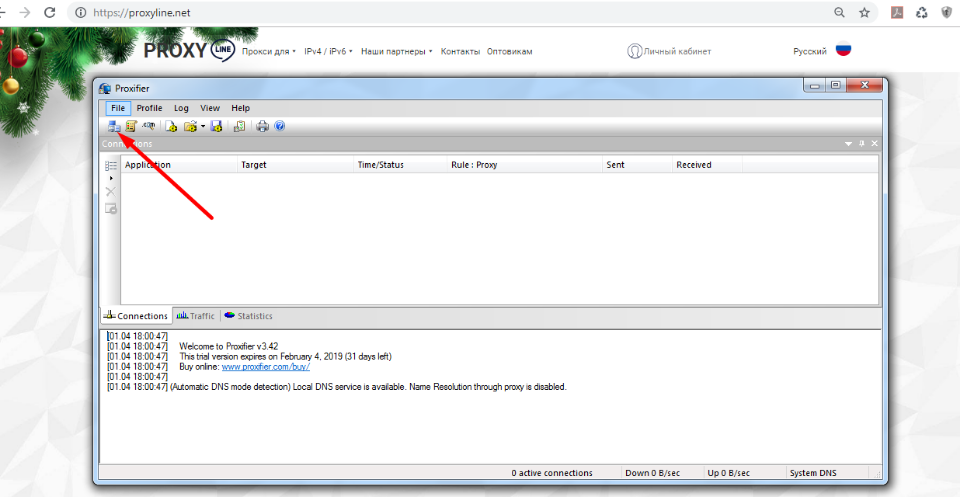
Configuring all traffic per proxy
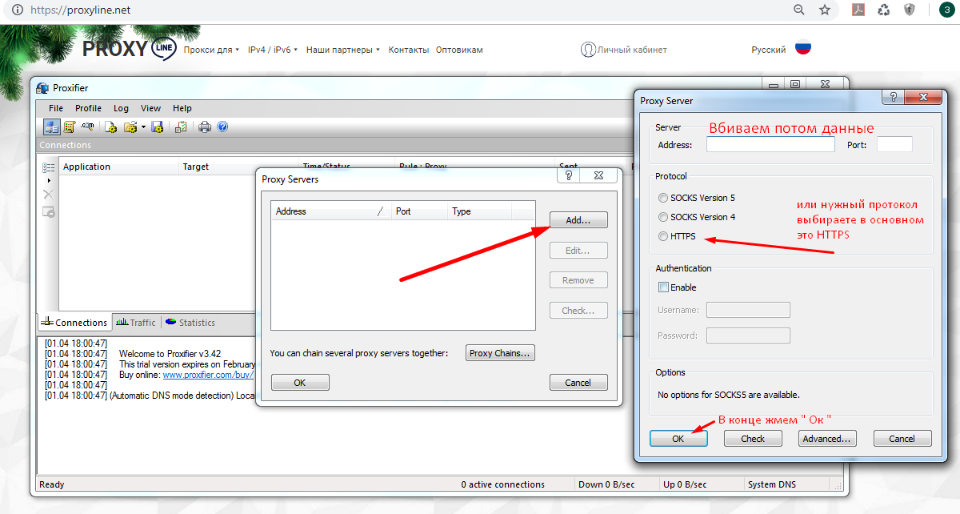
- As soon as we click on Proxy Servers, a window with an empty list appears. There you need to add a proxy by clicking the Add button.
- A window will appear where we will insert the IPv4 or IPv6 address in the Address field and the port number in the Port field. By the way, when writing the address, the port is separated from the IP address by a colon, for example – 213.27.152.15: 3128.
- If you have an individual proxy, there will be a username and password for it. They must be entered in the Username and Password field by checking the box in the Enable field.
- In the Protocol field don’t forget to select the protocol. HTTPS is usually used by browsers, SOCKS programs.
- Now press Check. The built-in tester will check the server for speed and availability. If the result is positive, save the settings by clicking OK and you will be asked if we want to use the added default proxy. Click YES – the setting is completed. Now all PC traffic will go through the specified proxy.
Configuring the traffic of a particular application for a particular proxy
If we have added multiple proxies, there is an option to use each for its own set of applications. Even if we have only 1 proxy, it can be bound to a separate program while the rest of the traffic goes in the usual way without bypassing it.- Select Profile Proxification Rules. By default, we see 1 line – Default. This is a setting for all programs. In the Action field, you can select a specific proxy, as well as Direct (enabled by default to bypass all proxies) and Block (selecting this item will block the entire connection to the internet on the PC) options.
- In the window that appears steal the name – the place Name.
- In place Applications add programs by clicking Browse – find files with an exe extension, say, firefox.exe.
- Target Hosts, Target ports – do not necessarily to be filled.
- Action – as described above – it is allowed to choose the process, which Proxifier will do if the list is running.
- Click OK to save the fix. Note that the newfangled principle is added above the Default field.
You might be interested in


Аffiliate program
The affiliate program allows you to earn 10% of all lifetime customer payments linked to your affiliate link.
To participate in the program you need
Attract new customers to us using a referral link — a user who registers using your link is assigned to you for life, and you will receive 10% from all his payments.
Affiliate reward can be displayed on ![]() WebMoney,
WebMoney, ![]() Yoomoney,
Yoomoney, ![]() Qiwi,
Qiwi,
![]() Tether USDT (TRC20) ,
Tether USDT (TRC20) , ![]() Bank card, or use it to pay for any services of our service.
Bank card, or use it to pay for any services of our service.

Do you have any questions or are you a wholesaler?
Email us at ![]() Telegram and we will try to help and advise you as quickly as possible.
Telegram and we will try to help and advise you as quickly as possible.
You can always get discounts and information on service updates on our Telegram channel.
Be sure to subscribe to the channel to keep up to date with all the news.


Спасибо!
Ваша заявка принята!
В ближайшее время
мы свяжемся с Вами
Ваша заявка принята!
В ближайшее время
мы свяжемся с Вами
